
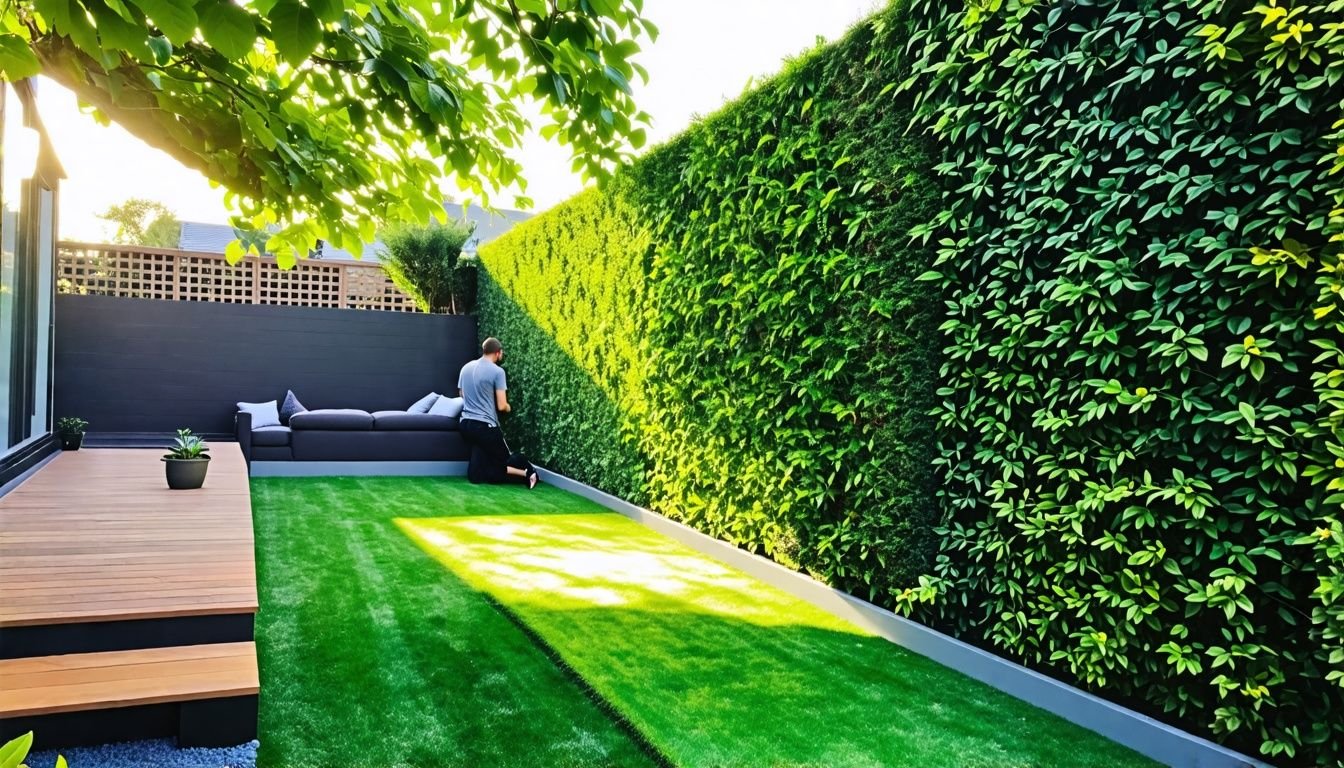
G’day, mates! Sick of staring at plain, boring walls in your outdoor space? We get it. Heaps of Aussies dream of lush, green gardens but don’t have the time, space, or green thumb to pull it off.
That’s where fake garden walls come in handy.
We’ve been in your shoes, too. Wanted a gorgeous green backdrop without the hassle of constant watering and pruning. After doing our homework, we reckon artificial green wall panels are a real ripper.
They’re UV stabilised, so they won’t fade in our harsh Aussie sun. Plus, they come in standard 1-meter by 1-meter sizes, making installation dead easy.
In this guide, we’ll walk you through creating your own stunning fake garden wall step by step. Ready to give your space a fair dinkum makeover?
Key Takeaways
- UV-stabilised artificial greenery panels resist fading and last longer in harsh Aussie sun, often coming with a 5-year warranty.
- Standard panels measure 1m x 1m, making installation easy. Prices range from $79.95 to $169.95 for quality options like the Artificial Green Forest Vertical Garden panel.
- Mixing textures and shades creates a more natural look. Combine smooth boxwood panels ($79.95 per square metre) with wilder fern panels ($89.95 per square metre) for depth.
- Regular cleaning with a soft brush or damp cloth keeps fake garden walls looking fresh. Avoid harsh chemicals that might damage UV-resistant coatings.
- Integrate lighting, such as LED strips or spotlights, to highlight textures and create ambiance. Combine with real potted plants for a blend of artificial and natural greenery.
Choosing the Right Artificial Greenery

Picking the perfect fake plants for your garden wall is crucial. We’ll guide you through selecting artificial greenery that looks real and lasts long.
Consider the Size and Scale
We need to think about size and scale when planning our fake garden wall. Our space will determine the right panel size for our project. Standard panels come in 1 metre by 1 metre squares, which work well for many walls.
But we might need to trim these for smaller areas or combine multiple panels for larger spaces.
It’s crucial to measure our wall accurately before buying any materials. We’ll want to avoid gaps or overhang, which can ruin the natural look we’re after. For example, the Artificial White Lavender panel (90cm x 90cm) might be perfect for a cosier nook, while the Artificial Spring Fern (100cm x 100cm) could suit a more expansive area.
We should also factor in any windows, doors, or other features that might affect our layout.
The scale of individual plants within the panels matters too. We want a mix that looks realistic and balanced. Smaller leaves and flowers work well for intimate spaces, creating a delicate feel.
Larger, bolder foliage can make a statement in open areas. By carefully considering size and scale, we’ll create a stunning fake garden wall that fits our space perfectly.
Selecting UV Stabilised Options
UV stabilised options are crucial for your fake garden wall. These products resist fading and maintain their vibrant colours over time. Our research shows that most UV stabilised panels come with a 5-year warranty, giving you peace of mind about your investment.
We’ve found some great deals on UV stabilised panels. The Artificial Green Forest Vertical Garden panel (1m x 1m) is now $349.95, down from $499.00. That’s a saving of $149.05! For a different look, the Artificial Lavandula Vertical Garden panel (1m x 1m) is priced at $129.95, reduced from $169.00.
Both options offer excellent value and long-lasting beauty for your outdoor space.
UV stabilised panels are the secret to a fake garden wall that stays fresh and vibrant year after year.
These panels are perfect for creating a lush, green backdrop in your yard or on your balcony. They’re easy to install and require minimal upkeep, making them ideal for busy Aussie gardeners who want a low-maintenance solution.
With UV stabilised options, you’ll enjoy a stunning green wall that looks fresh and natural for years to come.
Designing Your Fake Garden Wall
Designing your fake garden wall lets you unleash your creativity. We’ll guide you through planning the layout, picking colours, and mixing textures to create a stunning green feature.
Planning the Layout
We’ll start by mapping out our fake garden wall layout. This step sets the foundation for a stunning green space. We’ll sketch our ideas on paper, noting where we want different plants and textures.
Our plan will include varied heights and depths to create a natural, lush look.
Next, we’ll measure our wall space and divide it into sections. This helps us figure out how many panels or individual plants we need. We’ll also mark spots for any special features like lighting or water-resistant areas.
A well-planned layout ensures our artificial garden wall looks balanced and beautiful.
Choosing a Colour Scheme
After planning the layout, we need to pick the right colours for our fake garden wall. Colour choice plays a big role in creating a natural look. Our aim is to match the green shades of real plants.
We can start with a base of deep green panels, like the Green Tropics option. These mimic lush foliage and create depth. For variety, we might add lighter green shades to copy sunlit leaves.
The White Tropics panels offer a nice contrast and can brighten dark corners. To add a pop of colour, Pink Tropics panels work well as accent pieces.
It’s smart to stick to a few main colours to keep things simple. Too many shades can look messy and fake. We should also think about how the wall will look in different lights. UV-stabilised options, like the Red Tropics panel at $149.95, stay vibrant longer.
This helps our wall look fresh year-round without fading.
Incorporating Varied Textures
Moving from colour choices, we now focus on texture variety. Mixing different textures adds depth and interest to your fake garden wall. We suggest combining smooth and rough surfaces for a natural look.
Our preferred combination includes UV-stabilised boxwood panels ($79.95 per square metre) with fern vertical garden panels ($89.95 per square metre). The boxwood offers a neat, trimmed appearance, while the ferns provide a wild, lush feel.
This mix creates a dynamic visual effect that mimics real plant growth patterns.
To further enhance texture, we propose adding artificial buxus hedge panels ($94.95 per square metre) in specific areas. These panels have a more structured look, perfect for creating focal points or borders.
The varied textures not only make your wall more visually appealing but also more realistic, giving the impression of a living wall.
Essential Tools and Materials
We’ll need the right gear to create our fake garden wall. Our toolkit should include mounting supplies and safety equipment.
Mounting Supplies
Mounting supplies form the backbone of our fake garden wall project. We’ll need sturdy fasteners to secure our artificial greenery. Coolaroo Shade Cloth Timber Fasteners are a great choice, priced at $6.70 for a 50-pack.
These green fasteners blend seamlessly with our foliage, ensuring a polished look.
For larger structures, we might consider the Trio Hardaz Retaining Wall Corner Post. At $70.00, this 65 x 1100mm post offers solid support for our vertical garden. We can pair it with Trio Hardaz Trellis Plastic Green, available in 1200mm x 3m ($47.00) or 900mm x 3m ($33.90) sizes.
These trellises provide an ideal base for attaching our artificial plants. Let’s move on to the next crucial step in our DIY guide.
A well-planned vertical garden starts with the right mounting supplies.
Safety Equipment
Moving from mounting supplies, we must focus on safety gear. Safety comes first in any DIY project. We need to protect ourselves while creating our fake garden wall.
Essential safety items include gloves, safety glasses, and a dust mask. Gloves shield our hands from cuts and scrapes. Safety glasses guard our eyes from flying debris. A dust mask keeps us from breathing in harmful particles.
We should also wear closed-toe shoes to protect our feet.
For taller walls, we’ll need a sturdy ladder or scaffolding. These tools help us reach high spots safely. We might also use a safety harness for extra protection. Sandleford offers safety signs that can be useful in our work area.
Their Exit Safety Sign, priced at $28.00, can mark escape routes clearly.
Step-by-Step Installation Guide
We’ll guide you through the process of creating your fake garden wall. Our step-by-step guide covers everything from wall prep to adding the final touches.
Preparing the Wall Surface
Before we start our fake garden wall project, we need to prep the wall surface. This step is crucial for a sturdy and long-lasting result. First, we’ll clean the wall thoroughly, removing any dirt, dust, or loose paint.
A good scrub with soap and water usually does the trick. Next, we’ll repair any cracks or holes using filler and let it dry completely.
Once the wall is clean and smooth, we’ll apply a primer to help the adhesive stick better. This is especially important for outdoor walls that face harsh weather. We’ll choose a primer that suits our wall type, whether it’s brick, concrete, or wood.
After the primer dries, our wall is ready for the exciting part – adding the greenery!
A well-prepared wall is the foundation of a stunning artificial garden.
Attaching the Base Panels
Now that we’ve prepared the wall surface, it’s time to attach the base panels. We’ll start by securing the panels to the wall using strong adhesives and screws. For a 3m x 1m area, we recommend using a Double Sided Artificial Ivy Roll, which costs $69.95.
This product offers great value and coverage for your fake garden wall project.
We’ll apply the adhesive to the back of each panel and press it firmly against the wall. Next, we’ll use screws to reinforce the attachment, placing them at regular intervals along the edges and centre of the panel.
For added stability, we can use Greenlife Plastic Garden Pegs in Eucalypt Green, priced at $3.68 each, to secure the bottom edge of the panels to the ground or a sturdy base. This step ensures a solid foundation for your artificial greenery display.
Installing Individual Greenery Panels
We start the installation process by attaching the base panels to our wall. These panels serve as the foundation for our artificial garden. We secure them firmly using the right mounting supplies, making sure they’re level and evenly spaced.
Next, we add the individual greenery panels. We offer a range of options, including the Artificial Flowering Buxus Hedge Plant Panel and the Artificial Premium Natural Buxus Hedge Panel.
Both are UV stabilised, ensuring they’ll stay vibrant even in harsh Aussie sun. We carefully interlock these panels with the base, creating a seamless look.
As we work, we mix different textures and shades of green. This adds depth and realism to our fake garden wall. We might use the Artificial Flowering Buxus Hedge Plant Panel, priced at $89.95, for pops of colour.
The Artificial Premium Natural Buxus Hedge Panel, at $79.95, provides a lush green backdrop. With our panels in place, we’re ready to add those final touches that will bring our wall to life.
Adding Finishing Touches
We’ve laid the groundwork for our fake garden wall, and now it’s time to add those special touches. Let’s start with some eye-catching elements. Artificial flowers or colourful leaves can bring pops of vibrancy to your green wall.
We love using UV-stabilised options like the Amazon Jungle Recycled Artificial Green Wall Panel, priced at $169.95. This panel adds depth and interest to your design.
Lighting can transform your wall from day to night. Small LED lights tucked into the foliage create a magical glow after dark. For a natural look, we suggest mixing in a few real potted plants.
This blend of artificial and live greenery adds authenticity to your wall. The Boston Ivy Faux Hedge Wall Panel, now $89.95, pairs well with small pots of real herbs or ferns.
Don’t forget about texture. Adding moss panels creates a lush, forest-like feel. The Artificial Fresh Moss Green Wall Panel, at $129.95 per square metre, is perfect for this. We also recommend using different shades of green to mimic natural light and shadow.
This depth makes your wall look more realistic and inviting. With these finishing touches, your fake garden wall will become a stunning focal point in your space.
Maintenance Tips for Artificial Garden Walls
Keeping your artificial garden wall looking fresh requires minimal effort. Regular cleaning and checks will ensure your green oasis stays vibrant for years to come.
Cleaning and Dusting Techniques
We keep our fake garden walls looking fresh with regular cleaning. A soft brush or microfibre cloth works wonders for dusting. For stubborn dirt, we use a mild soap solution and gently wipe the leaves.
It’s crucial to avoid harsh chemicals that might damage the UV-resistant coating on our high-quality panels.
Proper care ensures our artificial greenery stays vibrant and lifelike. We make it a habit to inspect our walls monthly, adjusting any loose pieces and touching up as needed. This routine maintenance helps prevent fading and cracking, keeping our vertical gardens looking stunning year-round.
Next, let’s explore how to handle regular inspections and adjustments for your fake garden wall.
Regular Inspection and Adjustments
We must check our artificial garden walls regularly to keep them looking their best. Our inspection routine should include looking for loose panels, faded spots, or areas that need cleaning.
A quick once-over every few weeks helps us catch small issues before they become big problems. This proactive approach ensures our green walls stay stunning year-round.
Adjustments play a key role in maintaining our fake garden walls. We might need to reposition panels that have shifted or replace any damaged pieces. Most products come with a 5-year warranty, giving us peace of mind.
If we notice any fading, we can contact the supplier about UV-stabilised options. These special panels resist colour loss, keeping our walls vibrant for years to come.
Our DIY spirit shines when we tackle these tasks ourselves. We can use basic tools like screwdrivers or pliers for most adjustments. For cleaning, a soft brush or damp cloth often does the trick.
By staying on top of these simple tasks, we keep our artificial garden walls looking fresh and natural. Our efforts pay off with a beautiful, low-maintenance green space that adds life to our homes.
Styling Tips
We can make your fake garden wall pop with clever styling. Our tips will help you create a stunning focal point in your home or outdoor space.
Integrating Lighting Elements
Lighting can transform our fake garden wall into a stunning focal point. We love to add LED strip lights behind the greenery panels. This creates a soft, magical glow that highlights the textures and shapes of our artificial plants.
For a more dramatic effect, we install spotlights at the base of the wall. These shine upwards, casting interesting shadows and adding depth to our green oasis.
Our favourite trick is to use colour-changing bulbs. They let us switch up the mood of our space with just a tap on our phones. We can set warm white light for cosy nights or vibrant hues for parties.
The Coolaroo Instant Synthetic Turf looks amazing under these lights, its 12mm blades catching the glow beautifully. At $75 for a 3m roll, it’s an affordable way to add extra texture to our lit-up wall.
Combining with Natural Plants
We love mixing real plants with our fake garden walls. It adds depth and life to the overall look. We often use potted plants or hanging baskets to create a blend of artificial and natural greenery.
This combo works well for Aussie gardeners who want low-maintenance options but still crave some living elements.
Our favourite trick is to use UV-stabilised artificial panels as a backdrop. The Artificial Spring Sensation Hedge Wall Panel, now $89.95, serves as a great base. We then add real plants in front, creating layers and texture.
This method gives us the best of both worlds – the ease of fake plants with the freshness of real ones.
Troubleshooting Common Issues
Even the best fake garden walls can face issues over time. We’ll guide you through common problems and their fixes to keep your green wall looking fresh and vibrant.
Managing Sun Exposure
We know the Aussie sun can be harsh on our fake garden walls. That’s why we always opt for UV stabilised panels. These panels resist fading and keep their vibrant colours for years.
Our top pick is the Artificial Ivy Leaf Hedge Panel. It’s UV protected and costs $79.95, saving you $10 off the regular price.
For extra sun protection, we use Coolaroo Shade Cloth. This tough fabric blocks 90% of UV rays. We hang it over our artificial greenery during the hottest parts of the day. It’s a simple trick that extends the life of our fake plants.
Plus, it creates a cool, shaded spot in the garden.
We also rotate our panels every few months. This spreads out sun exposure evenly across all parts of the wall. It’s an easy way to prevent patchy fading and keep our green wall looking fresh.
With these tips, our fake garden walls stay lush and green, even under the intense Australian sun.
Addressing Wear and Tear
Artificial garden walls can face wear and tear over time. Sun exposure, weather, and accidental bumps may cause fading or damage. We suggest regular checks to spot any issues early.
If you notice loose panels or discoloured spots, fix them promptly. Most products come with a 5-year warranty, so keep your receipt handy.
For minor wear, a gentle clean with a soft brush can be very effective. Larger problems might need panel replacement. Our Artificial Deluxe Buxus Hedge Wall Panels are UV stabilised and cost $94.95 each.
They’re durable and long-lasting, perfect for Aussie conditions. With proper care, your artificial garden wall can look fresh for years.
Conclusion
We’ve explored the art of creating garden walls with artificial greenery. This DIY project offers a fresh way to bring nature indoors or spruce up outdoor spaces. With the right tools and a bit of creativity, anyone can craft a stunning green wall.
It’s worth considering UV-stable products for lasting beauty and easy upkeep. Your new garden wall will add a touch of green charm to your home for years to come.
FAQs
1. What materials do I need for a DIY fake garden wall?
You’ll need artificial trees, building supplies like glues and drills, and fake green walls. Don’t forget eyelets, sockets, and power tools for installation. Sandpaper helps smooth surfaces before attaching greenery.
2. How do I choose the right artificial greenery for my wall?
Pick artificial plants that suit your space. Consider the size of your wall and the look you want. Mix different types of fake plants for a natural feel. Remember, plant protection isn’t needed for artificial greenery.
3. Can I install a fake garden wall in my bathroom or kitchen?
Yes, you can create living walls in bathrooms or kitchens. These areas often have high humidity, which artificial plants can withstand. Make sure to use proper building materials and consider tiling or flooring beneath the wall.
4. Will a fake garden wall help with insulation or cooling?
While not as effective as real plants, fake green walls can provide some insulation. They may slightly reduce heat transfer, potentially helping with indoor heating and cooling. However, they won’t impact emissions or global warming like real plants.
5. How do I maintain my DIY fake garden wall?
Maintenance is simple. Use a squeegee or soft cloth to dust regularly. For deeper cleaning, a mild soap solution works well. Unlike real plants, you won’t need to worry about watering, fertility, or pest control.
6. Can I incorporate other elements into my fake garden wall?
Absolutely. You can add outdoor furniture pieces, letter boxes, or even small appliances like portable air conditioners. Just ensure these items are properly secured and don’t compromise the wall’s structure.